This guide provides homeowners and property managers in Massachusetts and New Hampshire with a clear, step-by-step plan for tackling water damage head-on. We'll cover how to prevent mold growth in the critical first 48 hours and explain the professional process for removing it safely and completely.
TLDR: The Water Damage & Mold Remediation Process
- Water damage creates the perfect breeding ground for mold, which can start growing in just 24-48 hours.
- Immediate action is vital: stop the leak, remove all standing water, and start drying the area with fans and dehumidifiers.
- For mold affecting more than 10 square feet or if you suspect toxic mold, always hire a certified professional for safe removal.
- The professional process involves assessment, containment, air filtration, removing contaminated materials, cleaning, and drying.
- Prevention is your best defense. Control indoor humidity, ensure good ventilation, and fix leaks immediately.
The Critical Link: How Water Damage Creates a Haven for Mold
Mold spores are a natural part of our environment, floating harmlessly in the air both indoors and out. They only become a problem when they find the right conditions to settle down and grow. Unfortunately, a water-damaged home provides the perfect trifecta:
- Moisture: A leak, flood, or even high humidity provides the water mold needs to thrive.
- A Food Source: Mold isn't picky. It happily feeds on organic materials common in every home, like drywall, wood studs, carpeting, and insulation.
- The Right Temperature: Standard indoor temperatures are ideal for mold growth.
Once these conditions are met, the clock starts ticking. According to the U.S. Environmental Protection Agency (EPA), mold can begin to grow on a damp surface within 24 to 48 hours. This is why swift action after any water event is not just recommended—it's essential.
Here in New England, we face unique challenges that make properties particularly vulnerable to mold:
- Heavy snowmelt and spring rains that can easily flood basements.
- Brutal winters that create ice dams, forcing water under roof shingles.
- Hot, humid summers that lead to condensation in poorly ventilated attics and basements.
Immediate Steps to Take After Water Damage (The First 48 Hours)
What you do in the first two days after discovering water damage can make the difference between a minor cleanup and a major mold infestation. If you're facing significant flooding or contaminated water, your first call should be to a professional restoration company. For smaller, manageable leaks, follow these steps immediately.
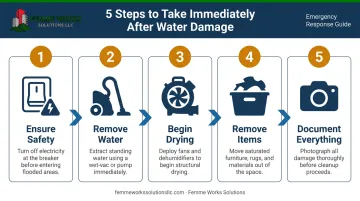
Step 1: Ensure Safety and Stop the Water Source
Before you do anything else, prioritize safety. If the leak is from your plumbing, find your home's main water shutoff valve and turn it off. Next, go to your breaker box and shut off electricity to the affected area to eliminate the risk of electrical shock. Never enter a room with standing water if the power is still on.
Step 2: Remove Standing Water
Get the water out as quickly as possible. For small areas, a wet/dry vacuum is an effective tool. Mops and buckets can work in a pinch, but they are much less efficient. If you're dealing with more than an inch or two of water, you’ll likely need professional extraction equipment.
Step 3: Begin the Drying Process
Your goal is to get the area bone-dry. If the weather is dry and not too humid, open windows to get air circulating. Set up high-powered fans and run dehumidifiers to pull moisture out of the air and surrounding materials. To prevent spreading spores, never aim fans directly at any visible mold. This process can take several days.
Step 4: Remove and Separate Damaged Items
Remove all waterlogged moveable items from the affected area. You'll need to separate them into two piles: salvageable and non-salvageable.
- Salvageable: Hard, non-porous items (e.g., plastic, metal, glass) can usually be cleaned and disinfected.
- Non-Salvageable: Saturated porous materials—like drywall, insulation, carpet padding, and books—are nearly impossible to dry completely and should be discarded.
Step 5: Document Everything
Before you remove or discard anything, document the damage thoroughly for your insurance claim. Take clear photos and videos of the water source, the extent of the flooding, and all damaged items. This evidence is crucial for getting your claim approved.
Identifying a Mold Problem in Your Home
Sometimes mold grows in plain sight, but it often hides behind walls, under floors, or in ceilings. If you've had a recent water leak or a lingering moisture problem, watch for these common signs.
Visible Growth
Mold can appear in many different colors, including black, green, white, or even orange. It might look like spots, patches, or discoloration on a surface. Don't assume that a certain color means it's "toxic black mold"—any color of mold in your home should be removed.
Musty Odor
Often, the first sign of a hidden mold problem is the smell. A persistent musty, earthy odor with no obvious source is a strong indicator that mold is growing somewhere out of sight. Trust your nose; if something smells damp and musty, it's worth investigating.
Health Symptoms
Unexplained health issues can also be the first clue. The World Health Organization reports that occupants of damp or moldy buildings have up to a 75% greater risk of respiratory symptoms and asthma. Common allergic reactions include:
- Persistent coughing or wheezing
- Sneezing and a runny nose
- Itchy, watery eyes
- Skin rashes
- Worsening asthma symptoms
If these symptoms improve when you leave the house, it could point to an indoor air quality issue like mold.
The Professional Mold Remediation Process: A Step-by-Step Guide
When you hire a certified mold remediation specialist, you’re not just paying for cleanup. You’re investing in a systematic process designed to safely remove mold and prevent it from returning. This guide outlines each step of that process.
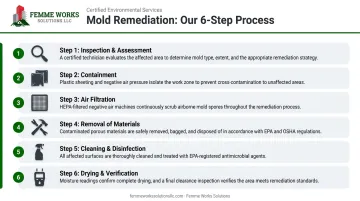
1. Inspection and Damage Assessment
The process starts with a thorough inspection. Professionals use tools like moisture meters and infrared cameras to find all the hidden moisture, not just what's visible. This allows them to map out the full extent of the water and mold damage, ensuring no pockets of moisture are left behind.
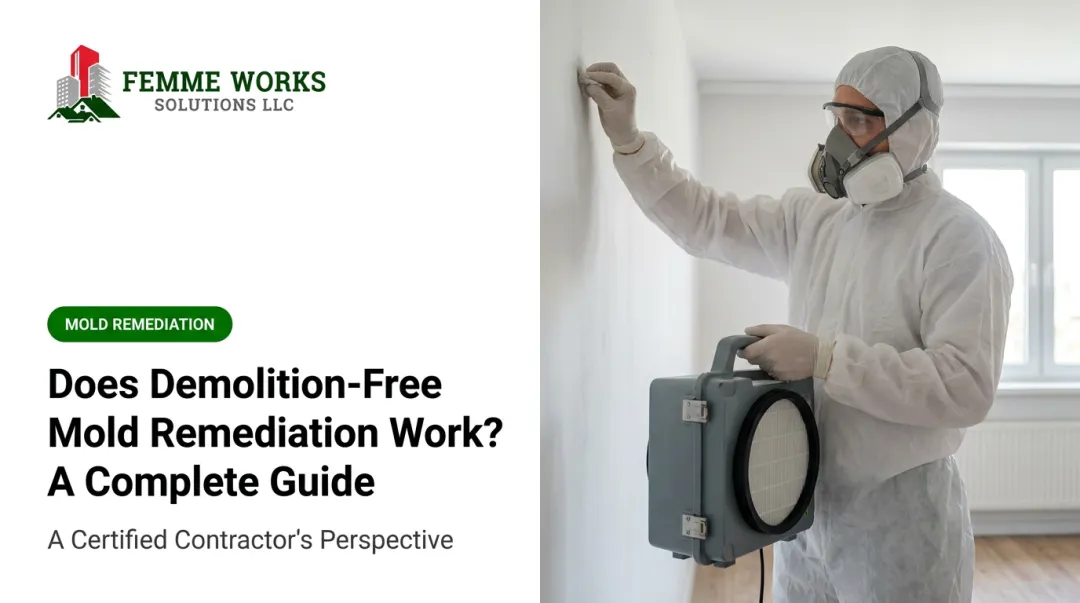
2. Containment of the Affected Area
To prevent mold spores from spreading to other parts of your home during removal, the contaminated area is sealed off. Technicians use heavy plastic sheeting to create physical barriers and often set up negative air pressure systems. These systems act like a vacuum, ensuring that any airborne spores are captured instead of escaping the work zone.
3. Air Filtration
During the entire remediation process, powerful HEPA (High-Efficiency Particulate Air) air scrubbers run continuously. These machines filter the air, capturing microscopic mold spores, dust, and other particles to purify the air in the contained area and the rest of the home.
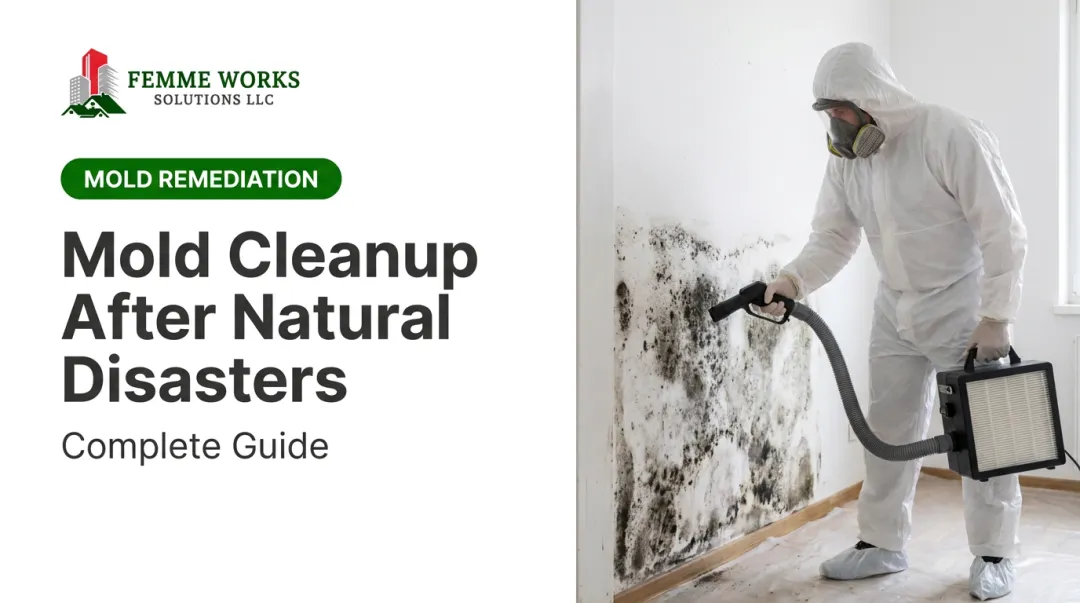
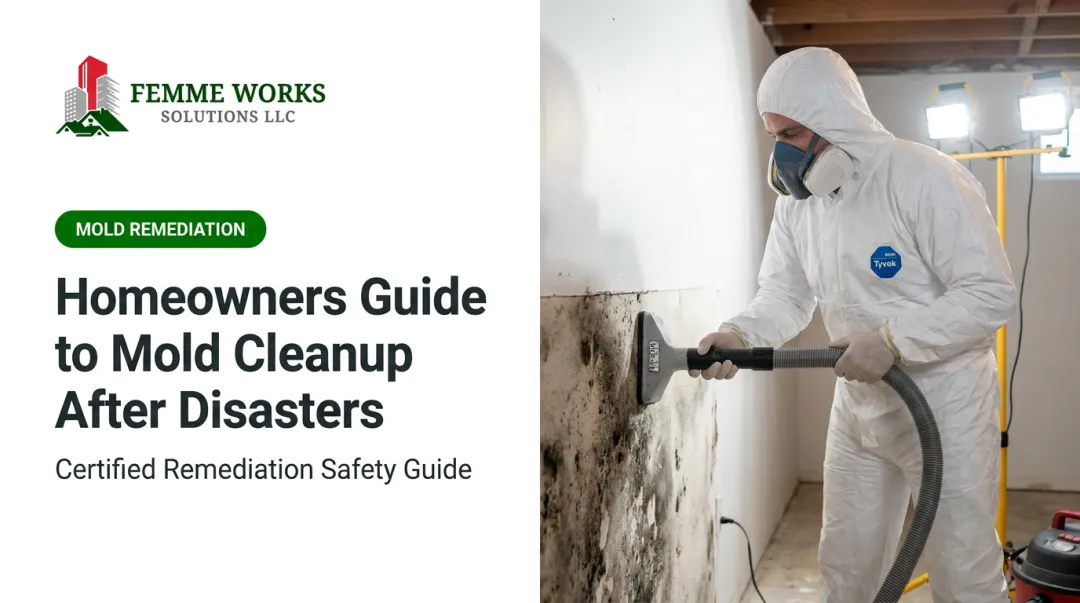
4. Removal of Mold-Infested Materials
Porous materials like drywall, insulation, and carpeting cannot be salvaged once contaminated with mold. Certified technicians carefully cut out and remove these materials, placing them in sealed bags for safe disposal according to state and federal regulations.
5. Cleaning and Disinfection
All non-porous materials that can be saved, such as wood framing, metal, and plastic, are meticulously cleaned. Professionals use EPA-approved antimicrobial agents to kill any remaining mold and prevent new growth. They also use HEPA vacuums to clean any remaining spores from all surfaces.
6. Drying and Post-Remediation Verification
The final and most crucial step is to ensure the area is completely dry. Technicians use industrial fans and dehumidifiers until moisture levels in the materials return to normal.
To confirm the job was successful, many homeowners opt for third-party post-remediation verification. This testing involves taking air samples to ensure spore counts have returned to a safe, normal level.
When to Call a Professional for Mold Remediation
All mold problems warrant professional evaluation, and many require certified remediation. Always call a certified professional if:
- The mold covers an area larger than 10 square feet.
- The mold comes back after you've tried cleaning it.
- The water damage was caused by contaminated water, like a sewage backup or floodwaters.
- You suspect mold is growing in your HVAC system.
- Anyone in the home is experiencing severe health symptoms or has a compromised immune system.
These larger or more complex situations require a certified, experienced, and insured team. Professionals are trained to handle hazardous materials safely, follow strict EPA and OSHA protocols, and use specialized equipment to guarantee complete removal.
Femme Works Solutions provides emergency services for urgent water damage situations across Massachusetts and New Hampshire. Our team responds quickly to protect your property and ensure the job is done right.
Frequently Asked Questions
Can you remove mold after water damage?
Yes, mold remediation is not only possible but essential. The key is to first fix the moisture source that allowed the mold to grow, and then follow a thorough, professional remediation process to safely remove it.
How long does it take mold to grow after water damage?
Mold can begin growing in as little as 24-48 hours after a water incident. This is why immediate drying efforts are so critical to preventing a small leak from turning into a major mold problem.
What time of year is worst for mold?
While mold can grow year-round, the humid summer months often accelerate its growth indoors. In the winter, issues like burst pipes from freezing temperatures and ice dams on roofs also create prime conditions for mold.
What are the health risks of mold exposure?
The risks range from common allergic reactions like sneezing, rashes, and a stuffy nose to more severe respiratory issues and asthma attacks. People with allergies, asthma, or weakened immune systems are at higher risk.
Does homeowners insurance typically cover mold remediation?
Coverage depends on your policy. Mold from a sudden event like a burst pipe may be covered, but damage from gradual leaks, poor maintenance, or flooding is typically excluded.
Is it safe to clean black mold myself?
No, you should not clean significant mold infestations yourself. Disturbing mold without proper containment can release a high concentration of spores into your home's air, posing a serious health risk.
Protect Your Home and Health from Mold
Dealing with water damage is stressful, but taking swift and decisive action can save you from the much larger headache of a mold infestation. Remember to act fast, understand the signs of mold, and never hesitate to call in professionals for significant infestations.
If you're facing water damage or a mold problem in Massachusetts or New Hampshire, don't wait. Contact the certified experts at Femme Works Solutions. As a woman-owned business with over 15 years of experience and 95+ five-star reviews, we provide safe, effective remediation with the transparent communication your family deserves.
Schedule your inspection today:
- Call: (978) 701-4140
- Online: Request an estimate here