Many homeowners think in terms of "mold remediation," but it's impossible to eliminate all mold spores from an environment. The real goal is "mold remediation"—the process of returning mold levels to a safe, natural state. This guide will walk you through assessing the damage, tackling small cleanup jobs safely, and knowing exactly when to call in the professionals.
TL;DR: Your Post-Disaster Mold Checklist
- Act within 24-48 hours to dry wet areas and slow mold growth.
- Contact a certified professional as soon as mold is found — after a disaster, contaminated water and widespread saturation make professional remediation essential.
- Call a certified professional immediately for any mold growth, especially in your HVAC system or caused by contaminated water.
- Never use bleach on porous surfaces like drywall; it can make the problem worse.
First Steps: What to Do in the First 48 Hours After a Disaster
The clock starts ticking the moment the water stops rising. According to FEMA, mold can begin growing on a damp surface within just 24 to 48 hours. Your immediate actions are critical to preventing a small moisture problem from becoming a major mold infestation.
First, if it’s safe to do so, stop the source of the water. Then, before you move or discard anything, document the damage for your insurance claim. Take clear photos and videos of all affected areas and damaged items. This evidence is crucial for a smooth claims process.
Next, focus on drying everything out. The key to controlling mold is controlling moisture.
- Use fans to circulate air around damp areas. Avoid pointing them directly at visible mold, as this can spread spores.
- Remove standing water from floors and carpets with a wet-dry vacuum.
- Run dehumidifiers to pull moisture from the air, aiming for a humidity level below 50%.
- Ventilate the space by opening windows and doors, but only if the air outside is less humid than inside.
Assessing the Scope of Your Mold Problem
Once the area is drying, assess the extent of the mold growth. Start with a careful inspection, looking for these key signs:
- Visible Growth: Patches can be black, green, white, or even orange.
- Musty Odors: An earthy smell often points to hidden mold behind walls or under flooring.
- Water Damage: Check for stained ceilings, discolored drywall, or peeling paint.
When Professional Remediation is Required
After a disaster, the scale, water contamination risk, and speed of mold growth make professional remediation essential. The U.S. Environmental Protection Agency (EPA) notes that widespread contamination, floodwater exposure, and porous materials all require certified professional handling.
Situations That Require a Certified Professional
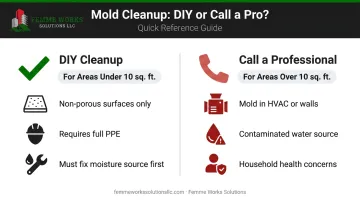
You need to call a certified remediation company if you encounter any of the following:
- The mold patch is larger than 10 square feet.
- You suspect mold is growing inside your walls, under flooring, or in your HVAC system.
- The water damage was caused by contaminated water, such as sewage or floodwater from a river.
- A household member has a compromised immune system, asthma, or other respiratory conditions.
Attempting to clean a large infestation without proper training and equipment can release a massive amount of spores into the air, contaminating your entire home and creating serious health risks.
For homeowners in Massachusetts and New Hampshire facing these larger challenges, working with a certified and insured company like Femme Works Solutions is critical.
With over 15 years of experience and full compliance with EPA and OSHA protocols, our team safely manages extensive mold remediation. This approach protects your family’s health and your property's value.
How Certified Professionals Handle Post-Disaster Mold Remediation
A safe and effective mold remediation after a disaster requires professional-grade equipment and certified expertise. Femme Works Solutions technicians follow a systematic process — containing affected areas with sealed barriers and HEPA-filtered negative air machines, safely removing contaminated porous materials, cleaning non-porous surfaces with EPA-approved antimicrobial agents, and thoroughly drying all materials with commercial-grade equipment. Throughout the process, our crew uses professional-grade PPE and follows all EPA, OSHA, and DEP protocols to protect your home and family. Learn more about our full toxic mold cleanup approach and residential mold remediation services.
Common (and Dangerous) Mold Cleanup Mistakes to Avoid
- Using bleach on porous surfaces like drywall or wood. This common mistake can make the problem worse. The water in bleach soaks into these materials and feeds the mold's roots long after the chlorine has evaporated, often allowing the mold to grow back stronger.
- Attempting remediation without proper containment and professional equipment. Disturbing mold without sealed containment and HEPA filtration releases concentrated spores into the air, spreading contamination throughout the home. As the CDC notes, safe mold remediation requires strict safety controls — which is why Femme Works certified technicians follow industry-standard protocols on every project.
- Painting over the mold instead of removing it. Covering mold with paint is a temporary fix that hides a bigger problem. The mold remains alive underneath and will continue to eat away at the material, leading to more significant damage over time.
Conclusion: Reclaiming Your Home Safely
Recovering from a disaster is stressful, and dealing with mold adds another layer of complexity. The most important things to remember are to act fast to dry wet areas, accurately assess the scope of the problem, and always put safety first.
After a disaster, the safest and most effective decision for your home and family is to call a certified professional. Femme Works Solutions is ready to assess, contain, and remediate mold safely — so you can reclaim your home with confidence.
For a safe and thorough solution to mold problems in Massachusetts or New Hampshire, contact the certified experts at Femme Works Solutions. We're here to help you reclaim your home and your peace of mind.
Frequently Asked Questions
How much does it typically cost to remove mold?
Costs vary widely based on the size of the affected area, the type of material, and the level of containment required. The only way to get an accurate price is to schedule an on-site inspection with a certified professional.
Will FEMA pay for mold remediation?
FEMA assistance may be available for mold caused by a federally declared disaster if you are uninsured or underinsured. Always check the official FEMA website for current eligibility rules and application details.
Can I just use bleach to kill mold on drywall?
No. Bleach is ineffective on porous surfaces like drywall and can make the problem worse. Its water content soaks into the material, feeding the mold's deeper roots even if the surface looks clean.
How long does a professional mold remediation take?
A small, contained job might take 1-3 days. However, extensive contamination affecting multiple rooms or an HVAC system could take a week or more to complete safely and thoroughly.
What are the health risks of living in a house with mold?
Mold exposure can cause allergic reactions (sneezing, rashes, itchy eyes), trigger asthma attacks, and lead to severe respiratory issues, especially in people with compromised immune systems.
Is a musty smell always a sign of mold?
Yes, a persistent musty odor is a strong sign of hidden mold, even if you can't see it. If you smell it, schedule a professional inspection to find the source behind walls or under floors.