However, this isn't just about brute force. A successful professional tile removal is built on smart preparation, the right equipment, and an unwavering commitment to safety. This guide covers everything homeowners need to know — from critical safety checks for hazards like asbestos to what the professional process of clearing your floor down to the subfloor actually looks like.
TL;DR
- Safety First: Test for asbestos in homes built before 1980 before starting any work — if positive, stop and call a licensed abatement contractor.
- Preparation is Key: The work area is cleared, water is shut off, fixtures are removed, and the area is sealed to contain dust before any removal begins.
- The Process: Professionals break tiles systematically, remove mortar, and inspect the subfloor — all while managing dust and debris safely.
- When to Get Help: If you suspect asbestos, find significant subfloor damage, or need a clean, compliant result, a certified professional is the right call.
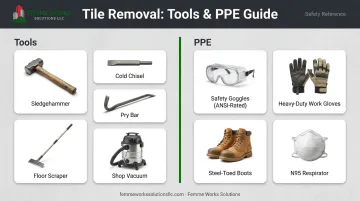
Before Work Begins: Essential Prep, Tools, and Safety
Before Work Begins: Essential Prep, Tools, and Safety
Proper preparation is 90% of the job. Rushing this stage leads to bigger messes, potential damage, and serious safety risks. Before any tile is touched, a certified team takes the time to get organized.
Critical Safety Check: The Asbestos Risk in Older Homes
If your home was built before the 1980s, you must stop and address the risk of asbestos before proceeding. Many older flooring materials, including vinyl, asphalt, and linoleum tiles, contained asbestos. More importantly, the black mastic adhesive used to glue them down is a common source of asbestos.
According to the U.S. Consumer Product Safety Commission, you cannot tell if a material contains asbestos just by looking at it. Disturbing these materials releases hazardous fibers into the air, which can cause serious long-term health issues.
If your home falls into this age category, get the tile and adhesive tested by a certified professional. Do not attempt to sample it yourself. If the test comes back positive, removal must be handled by a licensed asbestos abatement contractor — no exceptions.
A certified company like Femme Works Solutions handles this safely, operating in full compliance with EPA and Massachusetts DEP regulations. Certified professionals use specialized equipment like HEPA air scrubbers and negative air machines to contain hazardous dust safely.
Preparing the Bathroom for Demolition
Your contractor clears the room, shuts off water, removes fixtures, and seals the doorway with plastic sheeting before demolition begins. You don't need to prepare anything beyond clearing personal items.
What Professional Tile Removal Involves
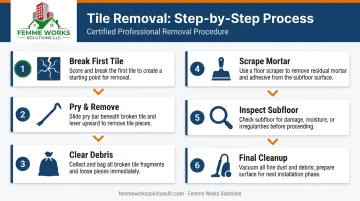
Before any tile is disturbed, the certified crew collects samples from the floor tiles and black mastic adhesive and sends them for asbestos testing. Nothing is touched until results clear the lab — if the test returns positive, a licensed abatement contractor takes over and no standard tile removal proceeds.
Once the floor is confirmed clear, the crew seals the room and establishes negative air pressure before work begins. Plastic sheeting is taped across the doorway, HVAC vents are covered, and ventilation is set to push air outward so demolition dust cannot migrate through the rest of the home.
With containment in place, tile and mortar are removed systematically. The crew works outward across the floor, breaking tiles and lifting them free, then scrapes the remaining thin-set or adhesive layer down to a flat substrate. After all material is cleared, the subfloor is inspected closely — particular attention goes to the area around the toilet flange and tub where water damage, soft spots, or rot are most likely to appear. Any damaged sections are noted for repair before new flooring is installed.
All debris is bagged, vacuumed, and disposed of in compliance with local construction waste regulations — heavy tile and mortar require specific handling that certified contractors manage as part of the job. Most standard bathroom tile removals finish within a single day. Femme Works Solutions provides a free inspection and written scope of work before any project starts, so there are no surprises on timeline or cost.
What Goes Wrong When Tile Removal Is Done Improperly
- Inadequate dust containment. Tile demolition generates fine silica and potentially asbestos-laden dust. Without proper sealing, negative air pressure, and HEPA filtration, that dust migrates throughout the home and creates a health hazard and a cleanup cost that far exceeds the job itself.
- Subfloor damage. Uncertified crews using incorrect tool angles punch holes in the subfloor, leading to costly structural repairs on top of the tile removal cost. A certified contractor uses proper technique and inspects the subfloor throughout.
- Overlooking potential asbestos. Older floor tiles (especially 9"x9" sizes) and the black mastic adhesive underneath may contain asbestos. These materials must never be scraped or sanded without prior professional testing.
Why Certified Professionals Are the Right Choice
Professional demolition contractors work faster, carry specialized equipment, and handle all debris disposal. They also carry the licensing, insurance, and compliance knowledge that protects homeowners from regulatory and health risks.
Certified professionals are the only appropriate choice when:
- Tiles test positive for asbestos. This requires certified experts and is a regulatory requirement — not optional.
- Extensive subfloor damage is present. Widespread rot or water damage needs a contractor to assess structural integrity and make the right repairs.
- The floor is set in a thick mortar bed with wire mesh. These older installations require specialized tools and professional handling.
- A clean, compliant result is required. Professional crews ensure safe containment, proper disposal, and a properly prepared subfloor for whatever comes next.
For all scenarios — from standard tile removal to situations involving potential asbestos, structural damage, or thick mortar beds — a certified team is the safest and most compliant choice. A professional crew from Femme Works Solutions can often complete a bathroom demolition in just a few hours. Their expertise in selective demolition ensures difficult situations are handled with precision and full regulatory compliance.
Conclusion
Removing old bathroom floor tile is a challenging first step in any bathroom remodel. Success hinges on careful preparation, using the right tools, and prioritizing safety above all else.
The most important takeaway is this: if your home was built before 1980, you must have materials tested for asbestos by a certified professional before any work begins. If that test comes back positive, removal must be handled by a licensed abatement contractor following State, DEP, and EPA regulations. Asbestos is a hazardous material that certified professionals like Femme Works Solutions are equipped to remove safely and compliantly, leaving you with a clean, properly prepared subfloor and full peace of mind.
Frequently Asked Questions
How much does it cost to get bathroom tiles removed?
The cost depends on an individual assessment of the job — including the size of the space, tile type, adhesive condition, and whether hazardous materials are present. Contact a professional for a free quote on your specific project.
What is the hardest part of removing floor tile?
The most physically demanding part of the process is often removing the stubborn thin-set mortar or old adhesive after the tiles are gone. A thick, old-school mortar bed can be particularly challenging to break up and requires specialized equipment to address safely.
How do you know if old floor tiles have asbestos?
You cannot identify asbestos visually. If your home was built before 1980 and has 9x9 inch tiles or black mastic adhesive, assume it's present. The only way to be certain is professional testing by an accredited lab.
Can floor tiles be removed without breaking them?
It is extremely difficult, especially for tiles set in mortar, and most will crack during removal. While carefully cutting all grout lines and prying gently is possible, there is no guarantee tiles can be salvaged intact.
Is it better to remove old tile or just tile over it?
Removing old tile is always the best practice for a durable result. Tiling over an existing floor can hide serious subfloor problems and create height issues with doors, the toilet flange, and room transitions.
How long does professional bathroom tile removal take?
For an average-sized bathroom, a professional crew from a certified company like Femme Works Solutions can often complete the removal in just a few hours — a fraction of the time an untrained person would need. The exact timeline depends on tile type, adhesive conditions, and whether any hazardous materials require special handling.