: Step-by-Step Guide](https://file-host.link/website/femmeworkssolutionsllc-m8k6c1/assets/blog-images/d00f21cc-954e-494d-b046-a2d9adb90161/1781037533682316_fbce1d887aab42ca9d0ebc860246bc14/360.webp)
Interior wall demolition looks straightforward from the outside, but it involves hidden systems, load-bearing structures, and potential hazardous materials that make professional assessment essential. The most important question to answer before any work begins is whether the wall is load-bearing. This guide walks homeowners through the essential pre-demolition assessments, what the professional process looks like, and what to expect when hiring a certified contractor.
TL;DR: What Interior Wall Removal Involves
- A structural assessment comes first — a certified professional confirms the wall is non-load-bearing before any work begins.
- Hazardous material testing is required in older homes before demolition — asbestos and lead paint must be cleared by a licensed specialist.
- A certified crew shuts off utilities, seals the room, and contains dust before touching the wall.
- The crew removes drywall, clears insulation, dismantles the frame, and preps the openings for repairs and finishing.
- Work stops immediately if asbestos, lead paint, or complex utilities are discovered — a licensed specialist takes over.
Before Work Starts: Essential Assessments, Safety, and Prep
In any interior demolition, the work done before touching a wall is what separates a smooth project from a dangerous and costly disaster. Proper preparation protects the safety of everyone involved and your home's structural integrity.
First, Is It Safe to Demolish?
Before any tools are gathered, two critical questions must be answered:
- Is this a load-bearing wall? Load-bearing status must be confirmed by a licensed contractor or structural engineer before demolition begins. Removing a load-bearing wall without engineered support causes structural failure and is not a compliant scope of work.
- Does the wall contain hazardous materials? Homes built before 1980 often contain asbestos in drywall, joint compounds, and plaster. Lead paint is also a common risk. Disturbing these materials releases toxic dust, so always have the wall tested by a certified professional before any work begins.
Work Area Preparation
Before demolition begins, the contractor shuts off utilities and verifies power is dead with a voltage tester, clears and protects the room, and seals doorways and HVAC vents with plastic sheeting to contain dust. Homeowners only need to remove personal items in advance.
The Critical First Step: Is Your Wall Load-Bearing?
This is the most critical assessment before any demolition begins. Removing a load-bearing wall without proper support can cause sagging floors, cracked drywall, or even catastrophic structural failure. A certified professional provides a definitive answer — never proceed on assumption alone.
How to Identify a Potentially Load-Bearing Wall
Only a professional can make a definitive determination, but several clues help inform an initial assessment.
- Check the Foundation: In the basement or crawlspace, a load-bearing wall often has a beam, post, or another wall directly beneath it to transfer the load down to the foundation.
- Look at the Joists: If ceiling or floor joists run perpendicular to the wall and rest on top of it, the wall is almost certainly load-bearing. Walls that run parallel to the joists are usually not.
- Note the Home's Structure: Exterior walls are always load-bearing. Interior walls located near the center of the house, especially on the first floor of a multi-story home, often carry a structural load.
- Find Spliced Joists: If floor joists are not continuous and instead overlap or connect directly over the wall, it is a load-bearing wall.
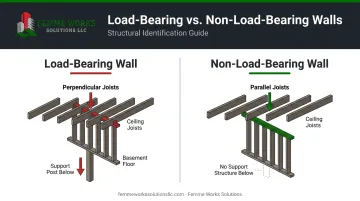
When in Doubt, Assume It's Load-Bearing
This is a non-negotiable safety rule. If there is any uncertainty after reviewing these indicators, the wall must be treated as load-bearing. Do not proceed with demolition. Instead, consult a structural engineer or a qualified demolition contractor like Femme Works Solutions for a definitive assessment.
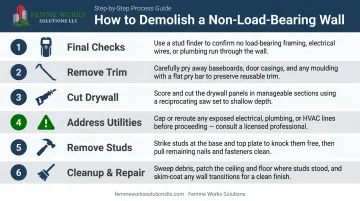
What Professional Interior Wall Demolition Involves
Once a wall has been 100% confirmed as non-load-bearing, and any hazardous materials have been tested and cleared, the professional demolition process can begin. Important Safety Note: Homes built before the 1990s may contain asbestos in drywall, joint compound, or insulation. Before any work begins, a professional inspection is required. This process applies only to walls confirmed to be free of hazardous materials.
The crew begins with a stud scan of the entire wall surface, locating every framing member and, more critically, mapping any electrical wiring or plumbing pipes hidden behind the drywall. If only a portion of the wall is coming down, the exact removal perimeter is marked before anything else happens.
Trim and baseboards come off first. The crew scores the caulk line, then carefully pries molding away from the adjacent surfaces without damaging the surrounding walls or floors.
Drywall is cut into large, manageable sections and removed from both sides to fully expose the wood frame. As the wall cavity opens up, the crew checks for insulation, old wiring, plumbing, or any suspect materials. If unexpected pipes, wires, or older materials like vermiculite insulation are discovered, work stops immediately and a licensed specialist is brought in to assess and resolve the situation before demolition continues.
Once the cavity is clear, the framing is dismantled and the top and bottom plates are pulled from the ceiling and floor. The crew then vacuums and sweeps the full area, leaving the openings in the ceiling, floor, and adjoining walls square, clean, and ready for patching and finishing. For any project in a home with potential hazards or complex structural conditions, professional selective demolition is the only compliant path forward.
Hazards That Require a Licensed Professional
Certain situations and discoveries are an immediate red flag, signaling that it is time to call in certified experts.
- Signs of a Load-Bearing Wall: Proceeding with demolition if a wall is even suspected of being load-bearing is the most dangerous mistake that can be made.
- Live Wires or Pipes: Failing to check for utilities can lead to electrocution, severe water damage, and costly repairs from licensed professionals.
- Asbestos or Lead Paint: Disturbing materials in homes built before 1980 can release toxic fibers and dust. This includes old insulation, floor tiles, and some textured paints.
- Complex Structural or Utility Issues: If the wall contains major HVAC ducts, complex plumbing stacks, or significant electrical circuits, these need to be rerouted by licensed professionals. This work often requires pulling permits.
This is a serious hazard in older homes, as lead-based paint was common before its ban in 1978. If asbestos or lead paint is suspected, stop work immediately.
This is not a cleanup that can be handled without professional intervention. It requires professional testing and abatement from a licensed and certified company like Femme Works Solutions. Our team is equipped to handle hazardous materials in compliance with all EPA, OSHA, and DEP protocols, ensuring your home is safe.
Build Your Dream Space Safely
Removing a non-load-bearing wall can completely transform your living space. Success comes down to careful preparation, a systematic approach, and, most importantly, a commitment to safety.
The initial assessment is the most critical part of the job. Correctly identifying load-bearing walls protects your home's structure, while checking for hazardous materials like asbestos or lead paint protects your family's health. If anything suspicious is uncovered, pause and call in certified professionals. A safe project is a successful one, giving you an open space you can enjoy with complete peace of mind.
Frequently Asked Questions
How much does it cost to demolish an interior wall?
The cost depends on an individual assessment of the job — including wall type, structural requirements, access, materials, and whether hazardous materials are present. Request a free quote from a licensed contractor to get an accurate figure for your specific project.
Do you need a permit to remove an interior wall?
Yes, a permit is almost always required for a load-bearing wall. For non-load-bearing walls, a permit is often needed if you alter electrical or plumbing lines. Always confirm specific requirements with your local building department.
How can you tell if a wall is load-bearing?
Look for key indicators: posts directly beneath it in the basement, ceiling or floor joists that rest on it perpendicularly, or a central location in your home's layout. If there is any doubt, you must consult a structural professional.
What should I do if I find asbestos or lead paint in my wall?
Stop work immediately. To prevent contamination, seal off the area with plastic sheeting and do not disturb the materials. Contact a licensed and certified asbestos abatement contractor for professional testing and safe removal.
Can a load-bearing wall be removed?
Yes, but it requires a structural engineer to design a new support system (like a properly sized beam) and a professional contractor to install it correctly to prevent the structure from collapsing.
What kind of repairs are needed after removing a wall?
You will need to patch the ceiling, floor, and adjoining walls. This typically involves new drywall and flooring repairs, such as patching carpet or wood, to create a seamless finish.